Pushing Sensor Data to Socrata
This example shows a simple data publishing scenario for publishing near real-time sensor data.
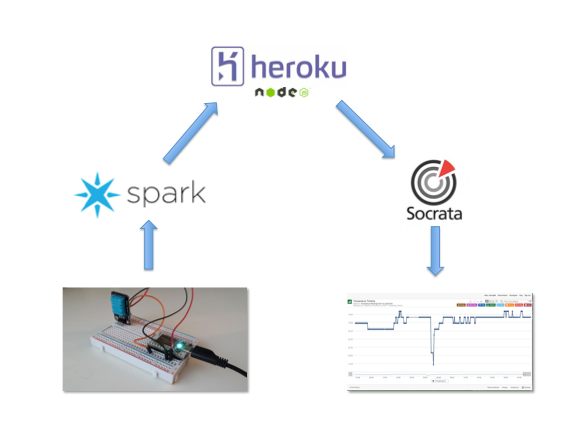
###Overview
We’ll be using a Spark Core, a development board that makes connecting hardware projects to the web really, really simple.
First we’ll set up the hardware and expose temperature readings on-demand with the Spark cloud api. Next we’ll set up a public dataset on Socrata that has two columns: timestamp and temperature. Finally, we’ll create a node script on Heroku to act as middle-man, getting temperature readings from Spark and POSTing them to our Socrata dataset.
###Hardware
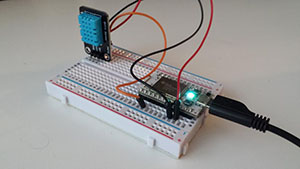
The Spark Core is a Wi-Fi development board that makes it easy to create internet-connected hardware. It’s basically an arduino that’s got a lot of intuitive add-ons for easy communication with the web. The first step is to power it on and get it connected to a wi-fi network. Spark makes this super easy, so all you have to do is fire up an app on your iOS or android device. It will sense a nearby Spark core, and allow you to easily add wifi credentials. Spark has a great walk-through of this process on their website. Once the Spark core is on wi-fi, we’re ready to wire up the sensor.

We’ll be using a popular temperature and humidity sensor known as the DHT11. The model shown comes on its own breakout board with a resistor and capacitor built-in, so it can be wired directly to the Spark core with no additional components.
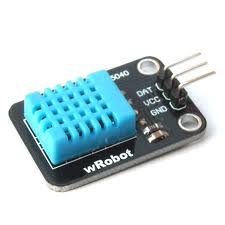
Wiring is simple: For power, we connect the DHT11’s “VCC” and “GND” pins to the Spark core’s 3V and GND pins. We connect the the pin labeled “DAT” to one of the digital inputs on the Spark core. That’s it! Now we’re ready to program the Spark core.
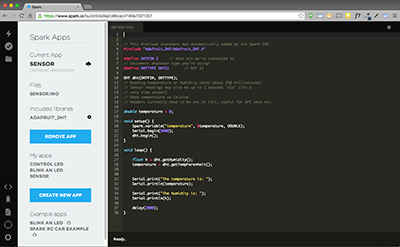
Spark has built a really useful cloud IDE (there is also a local version if you want to use it) that can flash the firmware of our Spark core over the web. Once you have an account on the Spark cloud, head over to https://www.particle.io and you can start coding immediately. When you’re ready to test, use the verify and flash icons in the upper left to send your new program down the core. It’s that easy!
More good news! The awesome folks over at Adafruit have written an open source arduino library that abstracts away the complexities of reading data from the DHT11. You simply tell it what type of DHT sensor you’re reading from, what pin it’s connected to, and you can take advantage of handy methods like getTemperature() and getHumidity(). The library takes care of all the timing and parsing of the serial data coming from the sensor!
Here’s the finished code, based on the examples included in the adafruit DHT library. After initialization, the loop runs every 2 seconds and sets the variable temperature to the latest temperature reading:
// This #include statement was automatically added by the Spark IDE.
#include "Adafruit_DHT/Adafruit_DHT.h"

// What pin we're connected to
#define DHTPIN 2

// Uncomment whatever type you're using!
#define DHTTYPE DHT11		// DHT 11

DHT dht(DHTPIN, DHTTYPE);
// Reading temperature or humidity takes about 250 milliseconds!
// Sensor readings may also be up to 2 seconds 'old' (its a
// very slow sensor)
// Read temperature as Celsius
// Headers currently need to be set at init, useful for API keys etc.

double temperature = 0;

void setup() {
    Spark.variable("temperature", &temperature, DOUBLE);
    Serial.begin(9600);
    dht.begin();
}

void loop() {

	float h = dht.getHumidity();
   	temperature = dht.getTempFarenheit();


    Serial.print("The temperature is: ");
    Serial.println(temperature);

    Serial.print("The humidity is: ");
    Serial.println(h);

    delay(2000);
}
But how does this make our temperature reading available on the web? Take a look at Spark.variable("temperature", &temperature, DOUBLE);. This line of code is anointing special properties to the variable temperature, and exposing it via the Spark core’s API. With the API, you can get or set individual pins, get or set variables, and even execute functions on the Spark core. More details are available in the docs. We’ll be using a simple GET that returns a variable, which is structured like this:
GET /v1/devices/{DEVICE_ID}/{VARIABLE}The device ID is unique to this Spark core, and the variable, of course, is temperature as explained above. Putting it all together along with an access token unique to my Spark account, the final GET looks like:
https://api.spark.io/v1/devices/48ff6b065067555044472287/temperature?access_token={myaccesstoken}…and yields results as JSON that look like this:
{
  "cmd": "VarReturn",
  "name": "temperature",
  "result": 73.4000015258789,
  "coreInfo": {
    "last_app": "",
    "last_heard": "2015-01-11T21:37:00.231Z",
    "connected": true,
    "deviceID": "48ff6b065067555044472287"
  }
}
The current temperature in my apartment is now available on-demand as JSON!
Socrata Dataset
Before we can start pumping our sensor data into Socrata, we need a dataset to push to. For this example, all we need are two columns, temperature (type:number) and timestamp (type:date & time). The dataset is located on my demonstration site at https://chriswhong.demo.socrata.com/Fun/Temperature-Readings-from-my-Apartment/e94e-r7vr
Building a Middle-man in Node
The end game here will be a script that we can use Heroku’s scheduler to run on a regular interval. It will do two things:
- Use the Spark API to get the current temperature from our sensor.
- Add a timestamp and push this data to Socrata using the SODA API.
Here’s a function that does the first bit, taking advantage of node’s request package to simplify the API call and the dotenv package to handle environment variables:
// API call for the sparkcore API
var url = 'https://api.spark.io/v1/devices/48ff6b065067555044472287/temperature?access_token=' + process.env.SPARKACCESSTOKEN;

getTemperature();

function getTemperature() {
	request(url, function (error, response, body) {
	  if (!error && response.statusCode == 200) {

	    var results = JSON.parse(body)

	    var payload = {  // Create an object with the current time and the temperature
	    	timestamp: moment().format(),
	    	temperature: Math.round(results.result * 100) / 100
	    }

    	var payloadArray = [] // We must pass an array when POSTing to Socrata
	    payloadArray.push(payload);

	    postToSocrata(payloadArray);
	  }
	})
}
Once we get raw results back from the Spark API, we use JSON.parse() to convert them into an object that we can easily read from. A new object called payload contains timestamp and temperature keys that we set to the current time (using moment.js) and our temperature reading rounded to 2 decimal places.
Finally, since we’ll eventually need to post an Array of objects to the SODA API, we put payload into a new array that gets passed to the postToSocrata() function;
postToSocrata() looks like this:
function postToSocrata(payloadArray) {

	request.post({
	  headers: {
	  	'X-App-Token' : process.env.SOCRATATOKEN,
	  	'Authorization' : 'Basic ' + new Buffer(process.env.SOCRATALOGIN + ':' + process.env.SOCRATAPASSWORD).toString('base64')
	  },
	  url:     'https://chriswhong.demo.socrata.com/resource/e94e-r7vr.json',
	  body:    JSON.stringify(payloadArray)
	}, function(error, response, body){
	  console.log(body);
	});
}
All it does is initiate an HTTP POST to the SODA endpoint for our Socrata Dataset. For the POST to work, we need to pass it Socrata login credentials with rights to modify the dataset, as well as a Socrata API token. These are passed via the X-App-Token and Authorization headers. For the body of the POST, we convert our payLoadArray into text using JSON.stringify(). The resulting string with our lone JSON object looks like this:
[ { timestamp: '2015-01-11T23:38:17-05:00', temperature: 71.6 } ]When the POST is complete, we log the body of the response and should see that one row was added to the dataset:
{
  "By RowIdentifier" : 0,
  "Rows Updated" : 0,
  "Rows Deleted" : 0,
  "Rows Created" : 1,
  "Errors" : 0,
  "By SID" : 0
}
Once everything is working locally, we can setup Heroku environment variables and push the code to Heroku.
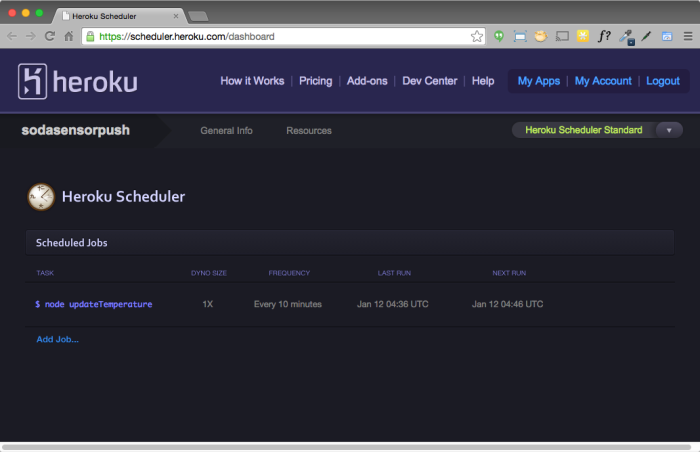
Automating it with Heroku Scheduler
Heroku Scheduler is a free add-on that will allow us to run this script on a schedule. Use the web GUI to enter the command to run (node updateTemperature) and select the frequency from a drop-down. That’s it! Now we’ll see our dataset updated with the latest temperature every 10 minutes.
You can check out the dataset on my demonstration Socrata site, or peruse the latest temperature readings using the Socrata Social Data Player below.
Check out the code on github. Happy Hardware Hacking!