Conditional notifications with Huginn
As more and more open datasets approach the point where they’re receiving “real time” updates, the topic of how to receive push or webhook notifications when a dataset is updated and matches certain conditions. For example, you might want to be notified when there are crimes in your neighborhood, when your local government releases a new dataset, or when the current number of outstanding pot hole requests go over a certain threshold.
Currently (or at least as of when this article is posted), Socrata Publica doesn’t support such notifications, but with a few open source tools, you can create incredibly powerful workflows alert you based on changes in open data (and do the rest of your bidding)!
We’re going to use an open source tool called Huginn to create our custom workflows. If you’re familiar with IFTTT, Huginn will seem conceptually similar - it allows you to set up triggers and actions that occur based on them. However, it is far more powerful - Huginn workflows can branch, have conditionals, make API calls, and even execute arbitrary JavaScript.
This tutorial will walk you through a simple scenario: My commute each morning takes me across the Aurora Bridge in Seattle, a high-level bridge that is prone to icing when it gets cold enough in the winter. The City of Seattle has recently published real-time road sensor readings that include road temperature readings.
Prerequisites
This tutorial assumes a couple of things:
- You have Huginn installed and running somewhere, or you have access to a running instance. You can run it locally on your own hardware, or you can run it in the cloud. I found their one-click Heroku option to be the quickest, and that’s how I developed this tutorial.
- You have a Twilio account and you’ve followed their tutorial to set up a phone number for sending texts. You don’t have to use Twilio for notifications - I actually use Slack for most of mine - and Huginn provides agents to push notifications via a number of different mechanisms.
Step 0: Author our SoQL query
Starting from our source dataset, I want to take the average of the last five road temperature readings and determine if they are below freezing. That will smooth out any momentary drops in the road temperature. So, I want to:
- Start with the API endpoint:
https://data.seattle.gov/resource/ivtm-938t.json $wherefilter to only get the readings for the Aurora Bridge:stationname = 'AuroraBridge'$orderthe results from latest to oldest:datetime DESC$limitmyself to only5results- Use
$selectto aggregate the results with aAVG(roadsurfacetemperature)
That last bit is a bit tricky, since it needs to be applied after all the other work is done. Don’t fret, because we have a SoQL feature that helps with that. Using the sub-query functionality of $query, we can chain our aggregation after the rest of our query.
The full query looks like the below, and outputs a single value representing the average of the last 5 sensor readings:
The TryIt macro has been disabled until future notice while we upgrade this site to SODA3.
Step 1: Call the API via a “Website Agent”
Our first step in Huginn will be to create a “Website Agent” to make our API call and turn the result into an event for our workflow:
- Within Huginn, select “Agents” and click “New Agent” to start the process of creating a new agent.
- In the “Type” dropdown, select “Website Agent”
- Fill out your new agent with the following details. If I don’t say what to fill out, accept the default:
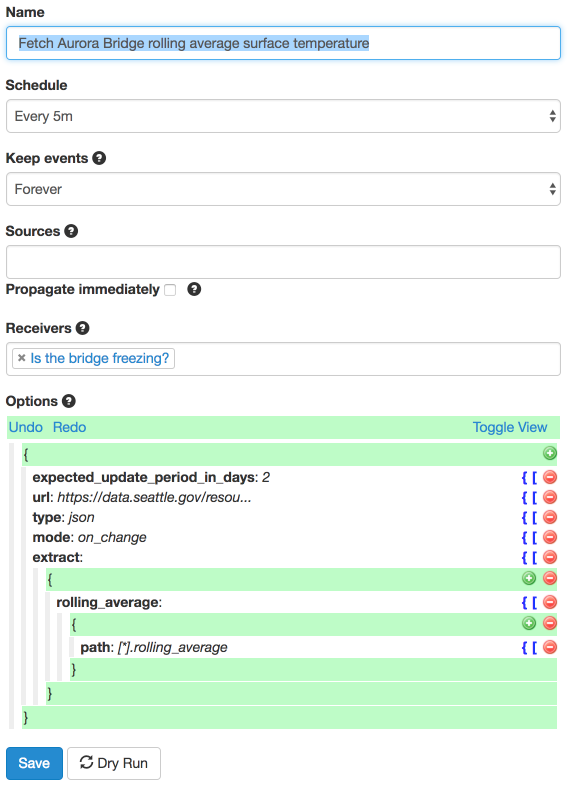
Name: Name your agent. I called mine “Fetch Aurora Bridge rolling average surface temperature”Schedule: Choose how often you want your agent to check the API. I chose “5 min”Sources: Leave blankPropagate Immediately: You can leave this unchecked, but I’m impatient and check itRecievers: Leave blank for nowOptions: Copy the details from the screenshot. Forurl, use the full URL for your query from above.
- Click “Save” when you’re done. When completed, your agent configuration should look like the screenshot to the right.
Step 2: Determine whether or not you want to pass on an alert
In this next step, we’ll use a “Trigger Agent” to conditionally pass on the events generated by our Website Agent and turn them into alerts to be messaged about.
- Select “Agents” and then “New Agent” to start the process of creating a new agent.
- In the “Type” dropdown, select “Trigger Agent”.
- Fill out your new agent with the following details:
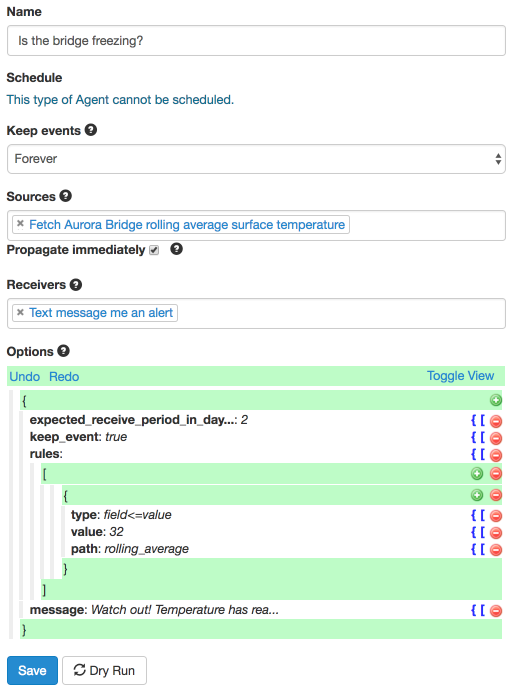
Name: Name your agent. I named mine “Is the bridge freezing?”Sources: Select the agent you created in Step 1Propagate Immediately: I’m impatient, so I check this box. If you leave it unchecked, you’ll need to wait for Huginn to pass on your events with each check it does, and it may take several minutes to be notified.Receivers: Leave this blank for now
- In the
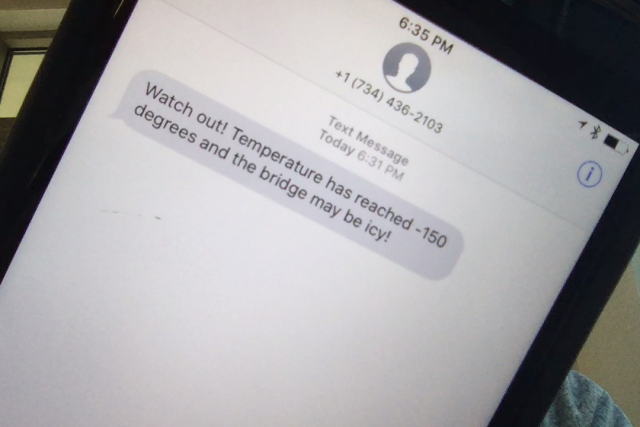
Optionssection of your agent configuration, match the details from the screenshot to the right. Most importantly:type: The type of check to perform. We want to see if our value is less than or equal to freeing, so we usefield<=valuepath: The JSON output by your SoQL query and extracted by your Website Agent, in my caserolling_averagevalue: The value to check against,32message: The message we want to format and pass on to the next step. It’s a Liquid-templated string, and we usedWatch out! Temperature has reached degrees and the bridge may be icy!
- Click “Save” when you’re done and your configuration matches the screenshot to the right.
Step 3: Send our text message with Twilio
This is where the rubber hits the road! We’ll be setting up a “Twilio Agent” to send us a text message via Twilio when the above criteria is met.
Heads Up! Twilio is a paid service, and if you want to send actual text messages, you’ll need to add a credit card to your account. If you just want to try things out, you can use your test credentials, but the workflow won’t send actual alerts.
Follow the steps below to set up your Twilio Agent:
- Select “Agents” and then “New Agent” to start the process of creating a new agent
- In the “Type” dropdown, select “Twilio Agent”
- Fill out your new agent with the following details:
Name: Name your agent. I called mine “Text message me an alert”Sources: Select the agent you created in Step 2Propagate Immediately: You can leave this unchecked, but I’m impatient and check it
- Under
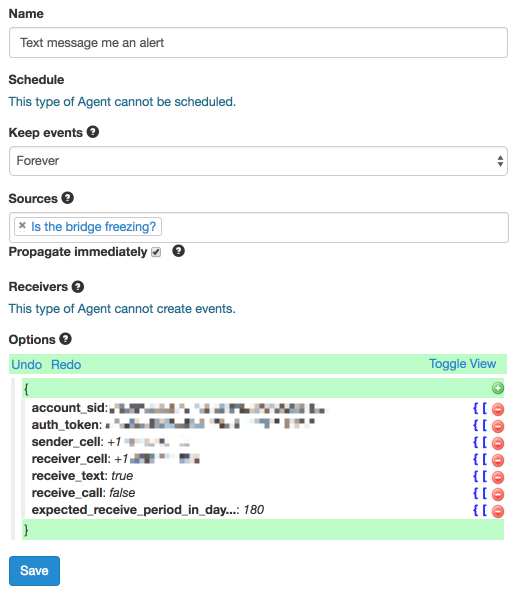
Options, make yours look similar to the screenshot, filling in the details below based on your credentials in Twilio:account_sidandauth_token: Your account SID and secret auth token from your Twilio account detailssender_cell: The phone number Twilio is configured to send fromreceiver_cell: The cell phone number you want the text message to go toreceive_text: Must be set totrueto have the agent send a text messagereceive_call: Must be set tofalseexpected_receive_period_in_days: Set this to however often you expect this agent to receive a “bridge frozen” event from it source. The agent will wait this long before setting a flag to note that it might be broken. I set mine to180, which might not be long enough in Seattle.
- Click “Save” when you’re done. When completed, your agent configuration should look like the screenshot to the right.
Step 4: Testing!
At this point you have a few options to test things out:
- Wait until Seattle drops below freezing. As it is almost April, this may not happen for awhile.
- Adjust the
valuein your Trigger Agent to trigger at a much higher temperature. - Create an agent that will inject a fake event into the workflow. This is the option we’ll use.
To create an agent that can emit fake events:
- Select “Agents” and then “New Agent” to start the process of creating a new agent
- In the “Type” dropdown, select “Manual Event Agent”
- Fill out your new agent with the following details:
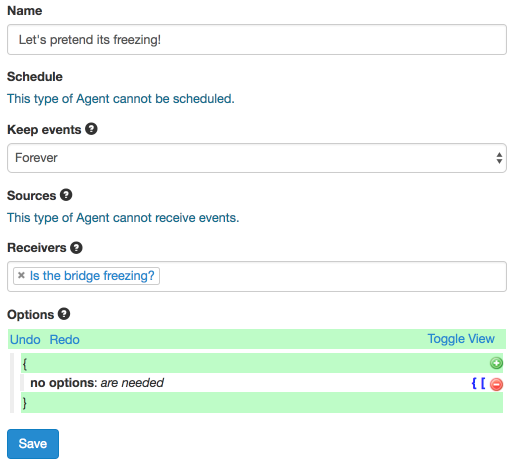
Name: Name your agent. I called mine “Let’s pretend its freezing!”Receivers: Select the agent you created in Step 2
- Click “Save” when you’re done. When completed, your agent configuration should look like the screenshot to the right.
Next, use your Manual Event Agent to fake an event that makes it look like the temperature dropped below freeing:
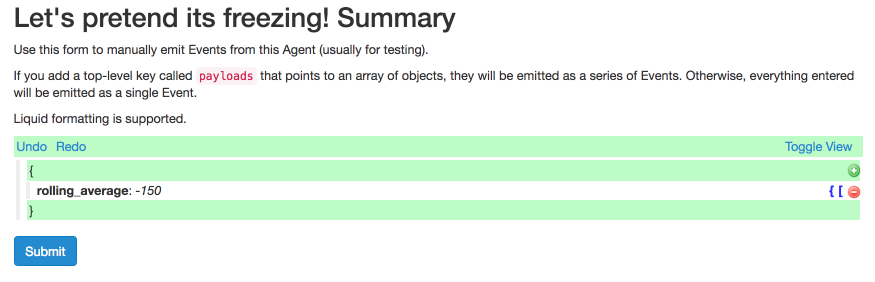
- Click on your Manual Event Agent within the agent listing
- Within the event payload, click the “+” button to create a single key/value pair:
- For the key (on the left), use our variable name:
rolling_average - For the value, use something below freezing, like
-150
- For the key (on the left), use our variable name:
- Click “Submit” to emit your event into the system.
Your fake event will then propagate through the system, and if everything is configured properly, you’ll get a text message to your device!
By now, hopefully your mind is buzzing with ideas of how you can use Huginn to monitor and alert based on open data! Please let us know what you come up with!
By the way…
After sleeping on this post, I actually realized we could skip the “Trigger Agent” by modifying our SoQL query slightly. By using the $having filter on our aggregation, we can make it only return a temperature value when its less than our specified threshold:
The TryIt macro has been disabled until future notice while we upgrade this site to SODA3.
Don’t be surprised if the query above doesn’t output any records when you click on it, that’s the point! It’ll only return a rolling_average when its 32 degrees or less. This would allow us to connect our Website Agent directly to our Twilio Agent, simplifying our workflow! However, its also harder to test, and we’d need to format our message either with aggregation in our SELECT or with an additional “Liquid Output Agent” before the Twilio Agent. That exercise is left up to the reader!