Validate Your Data with FME
This post describes how to use an FME workspace to validate your data and highlight what data cleansing needs to be undertaken before putting it into Socrata. FME is a powerful tool for not only data automation, but data analysis. Here we will use it to do a ‘health check’ on our data to understand what errors, warnings and roadblocks it may cause. To better understand the rules for importing data, check out this support article that discusses importing your data into Socrata.
Prerequisites:
- An installed copy of FME Desktop 2016.1 - the latest version can be downloaded here
- Limited experience for use with FME, for a warmup see this previous post: Using the FME Socrata Writer
- An installed copy of Microsoft Excel
- Read access to a dataset of your choice that will be ingressed to Socrata
- Publishing rights to a Socrata domain - you will need this if you plan to publish your cleansed data to Socrata. It is not required for the data cleanse operation, but is a good test of data cleanliness to publish it.
Contents:
- Getting to know data validation rules for Socrata
- Creating your schema map
- Running the FME validation workspace
- Interpreting your results
Data Validation for Socrata
Data must be properly formatted for each data type to be ingressed into Socrata. If the data is not formatted it may not load properly, or in some cases not at all. If you are using FME to publish your data, the workflow will fail if your data is not formatted. Data types are used to tell a common story by allowing each data type to be filtered, displayed and analyzed in their own ways.
This post and the FME workspace will be focusing on the following data types:
- Calendar date
- Checkbox
- Number
- Percent
- Text
These data types are the most commonly used and have a high potential for error, but are also very easy to fix! This workspace can be used and reused as a tool to assess a variety of datasets that you plan to ingress to Socrata. The output file from the workspace will guide you to where errors may lie within your dataset and give you an idea of how many, if any, errors need to be fixed. As a user, you will need to know: What your data should look like If the rule failures are problems with the data If action should be taken to change the data
Creating Your Schema Map
In order for FME to validate your data against the correct rules, each attribute (or column) must be assigned a data type that Socrata can read. From here each feature (or row) can be broken apart so every cell is matched to the correct set of rules. To do this, we must establish a schema for your dataset, a schema is what tells the program how to read and organize your data. You will be building your schema in an Excel using a template file which will be read by your FME workspace - this is much easier than assigning each attribute a data type within FME.
- Open the Schema Map Template in Excel, rename and save your Schema Map.
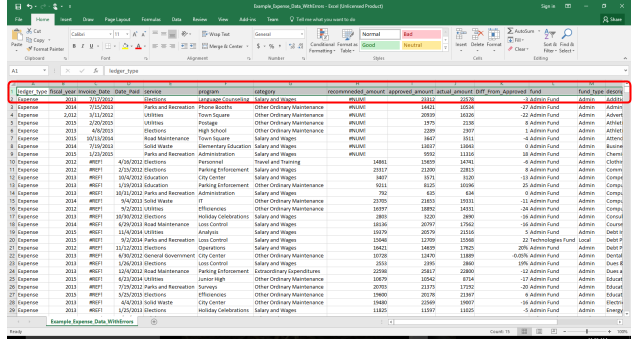
- Open the dataset to validate in Excel. Note: you may have to extract your dataset from another source like a database, it is best practice to export as a
.csv. -
Highlight all attribute names on the sheet and Copy.
-
In your schema map workbook, on the Schema_Map sheet, in cell A2 Paste Special, Transpose. This will create a list of your attributes to validate.
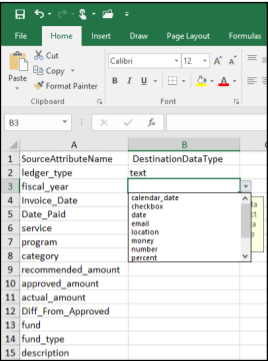
- Use the drop down menu in cell B2 to select the Socrata data type for the attribute in cell A2. Repeat this for all attributes listed in column A. Note: Best practice that ZIP codes, unique ID fields (employee/invoice ID’s) should be set to text to avoid errors such as dropping leading zeros (northeast US Zip codes), and dashes in ZIP code plus four’s.
- Save your changes.
Running the FME Validation Workspace
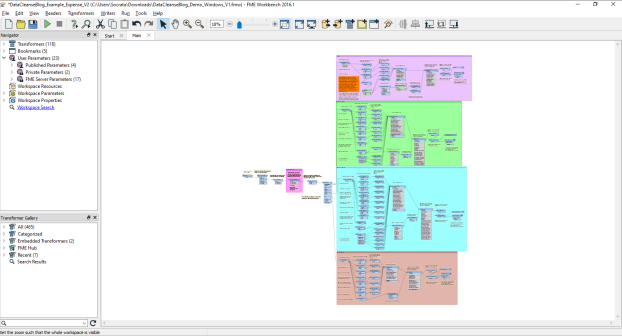
This workspace is intended for a range of users, it is heavily annotated to inform users how things are working and shows all connections/transformers.
-
Open the FME validation workspace, rename and save your validation workspace. Note your workspace may look different based on operating system and FME version. These screenshots come from FME 2016.1.3.0 - Build 16709 - WIN64, used in Windows 10 Pro.
-
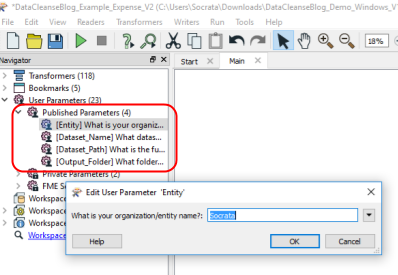
Update Published Parameters by double clicking on each parameter in the Navigator pane
-
Entity: Your organization/entity name (used only for output file naming purposes) -
Dataset_Name: Populate this with your dataset, general text or dataset identifier are allowed (used only for output file naming purposes) -
Dataset_Path: The full file path for where the dataset to validate including extension -
Output_Folder: Folder where you want the output.xlsx, you must include the final “/” at the end of the path
-
-
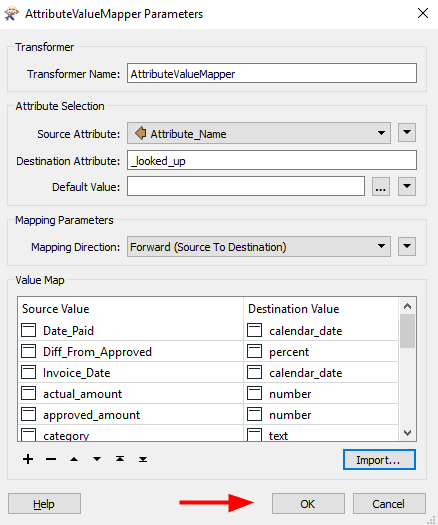
Add your schema map to the workspace by updating the AttributeValueMapper transformer
-
Open the
AttributeValueMapperdialogue box and click Import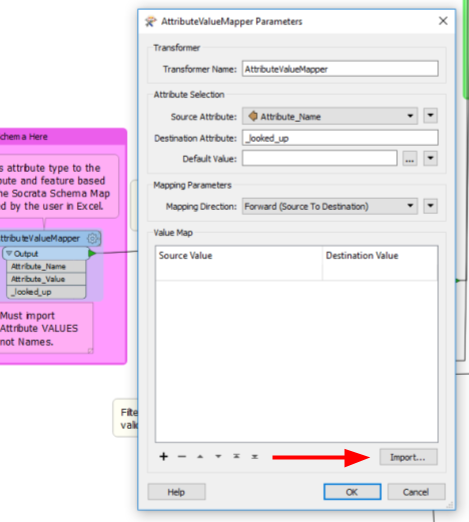
-
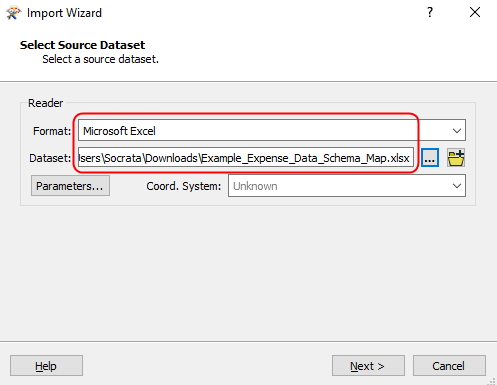
Select the format of your dataset to validate and its file path, then click next
-
Change the Import Mode to Attribute Values. Select the Feature Type by clicking the box next to
Schema_Mapto point the Import Wizard to the correct Excel sheet, then click Next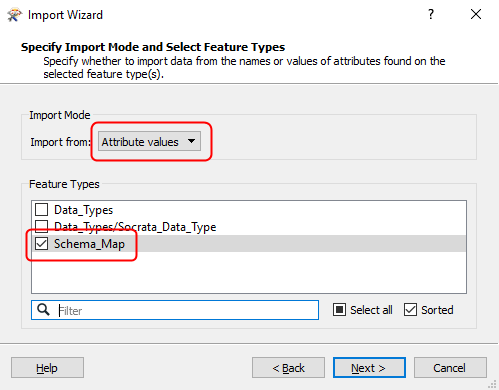
-
Select the attributes for the source and destination fields. The “Source Value” should come from
SourceAttributeNameand the destination should come fromDestinationDataType. Click “Import”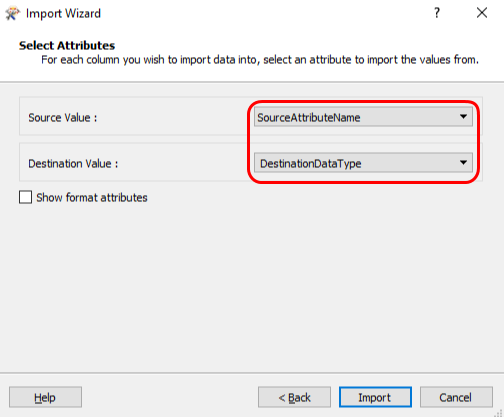
-
FME should have imported your dataset’s attribute names and data types. Click OK to complete the import process.
-
-
Add inspectors where you want to monitor specific errors.
-
If there are specific errors you want to track more closely, you can insert
InspectorsonAttributeValidatorsorTesters. If you want to track a specific validation rule that you’re curious about, adding an inspector midway through the workspace will show which specific cells do not pass validation rules.Inspectorscan be added by right clicking on an outgoing port (green triangle pointing right) of a transformer and clicking “Connect Inspector.”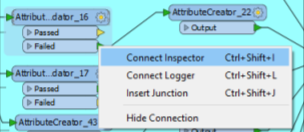
-
-
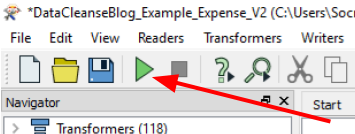
Run the workspace
-
Click the green “play” button in the toolbar.
-
-
Examine your results and assess your data
- An
.xlsxwill be output the folder you specified with a name including your entity, the dataset validated and a timestamp of when the workspace was ran.
- An
Interpreting your results
With the Excel output quantifying potential errors to fix, use your favorite platform to cleanse the data. To better understand each of validation rules, check out this table. If you cannot see the errors in your dataset that the workspace is reporting, open your dataset in the FME Data Inspector. If you are using Excel to view your dataset, it may be automatically formatting the data and hiding the errors.
Not all validation failures are errors in the dataset, it is up to the user to decide if these should be ignored or if they should be changed. For example, if negative numbers are found in a dataset, the user needs to decide if they can be allowed or amended.
The workspace can be reran to validate a cleansed dataset as many times as you like. If you change your schema, you will need to update the schema map and workspace to read any changes (revisit the Creating Your Schema Map or Running the FME Validation Workspace sections of this page).
Dates:
Safe has created a quick tutorial to better understand how dates are handled in FME. It’s recommended to learn about how dates are read, especially by the DateFormatter. This tutorial will give you enough knowledge to make you dangerous, but some experimentation will help you understand what’s happening under the hood.
WARNING: The DateFormatter coerces your data from one string into another, some of the calculations it does in the process may change your data. Review this cheat sheet to see how DateFormatter coerces common errors in date fields to properly formatted dates. There may be consequences when you set the Source Date Format parameter to be “Unknown - Automatic Detection.” You can decrease errors by properly populating the Source Date Format parameter, see the DateFormatter help link above. If your date is in a format that has day before month, then you must input an expected format.
Pro Tips for dates:
To avoid letting DateFormatter create problems, you can format your date to YYYYMMDD before it is read into FME. For example, you can use the following expression in SQL to help - if that is how your data is stored.
SELECT CONVERT(VARCHAR(10),getdate(),120)
When choosing a date format to publish on Socrata, the Socrata writer in FME has two different date formats to write. The data type calendar_date should be used if there is no time zone included in the data. If time zone data is not essential, it is recommended not to include it.
Some common date formats converted to FME date formats:
DD.MM.YYYY→%d.%m.%YMM/DD/YYYY→%m/%d/%YMM-DD-YY→%m"-"%d"-"%yYYYY-MM-DD['T']HH:mm:ssZ(ISO8601 with timezone) →%Y-%m-%dT%H:%M:%S%Z
Other links to better understand date formatting:
- https://msdn.microsoft.com/en-us/library/ms187928.aspx
- http://socrata.github.io/datasync/resources/using-map-fields-dialog.html
- http://socrata.github.io/datasync/resources/control-config.html#datetime-formatting
Leading Zeros:
Leading zeros are zeros at the beginning of your data e.g. 0001234. They can cause problems when importing into Socrata as a number. Not all leading zeros are errors or poor data, for example some zip codes, vendor ID’s or phone numbers start with a zero and must be present. In these cases you may consider switching the data type to text. For advice on how to clean up your leading zeros, here’s a support article to help.