Using the FME Socrata Writer
This guide describes how to use FME Desktop to setup a basic workspace to publish data to a Socrata dataset from a Microsoft Excel (.xlsx/.xls) file.
Prerequisites
Before you begin this tutorial, you should have the following:
- An installed copy of FME Desktop 2015 or 2014 SP4 (Windows, Mac, or Linux)
- Download FME 2015 (recommended) or FME 2014 SP4
- If you are using FME 2013 or FME 2014, we strongly recommend updating to the latest version of FME to make use of the newest Socrata Writer.
- Socrata account with a Publisher role or Owner rights to at least one existing dataset
If you do not have a license of FME, as a Socrata user you can get a 30 day free trial here.
Contents
- Setting up the workflow in FME Desktop
- Example FME workflow to download
- Proxy configuration
- Scheduling FME transformations
Setting up the workflow in FME Desktop

Step 1: Open FME and create a new blank workspace
Open up FME Workbench and create new blank workspace (File -> New and select Blank Workspace on the right).
Step 2: Add a Reader for the .xlsx/.xls file
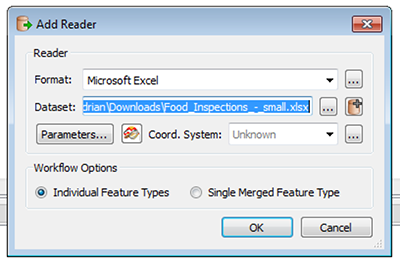
Data readers are used to read data from some data source into FME. Add a new Reader by clicking the button on the toolbar or going to Readers -> Add Reader… In the dialog box that appears click the […] button to the right of the Dataset field and select the .xlsx/.xls file on your computer. After clicking open FME should automatically detect that the format is Microsoft Excel. Now click OK and you should see a Reader Object appear in the workspace area.
Step 3a: Add the Socrata Writer
Now add a writer by clicking the Add new writer button in the toolbar or going to Writers -> Add Writer… In the dialog box that appears type “Socrata” as the format (it should come up as you are typing). Next click the Parameters button and in the dialog box that appears enter the domain of your datasite (i.e. data.cityofchicago.org) and your Socrata username and password.
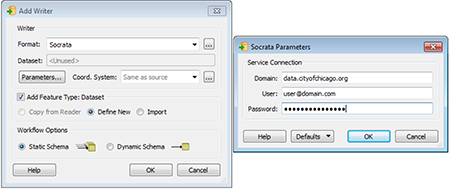
Click OK which will bring up a new window (if it asks you if you would like to “add a new feature type to the writer” click Yes).
Step 3b: Configure dataset to publish to
Option 1 - Publish to existing dataset
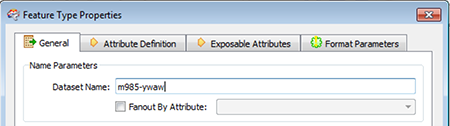
In the “Dataset Name” field enter the dataset ID of the Socrata dataset you wish to publish to. To obtain the dataset ID, navigate to the dataset in your web browser. In the address bar the dataset ID is the code at the end of the URL in the form xxxx-xxxx. For example, for the dataset https://data.seattle.gov/Public-Safety/Fire-911/m985-ywaw, it’s identifier would be m985-ywaw.
Option 2 - Create a new dataset
FME can also create a new Socrata dataset automatically. Simply enter the name you would like the dataset to have in the “Dataset Name” field. After finshing the workflow configuration (detailed in Step 4 and 5 below) and running the workflow look in the FME log entry that outputs the dataset ID of the newly created dataset, for example:
Socrata Writer: 'TEMP.csv' was successfully imported as a new Socrata dataset. The dataset ID is 'k5ad-vnv2'
To have the workflow update the dataset you should set the “Dataset Name” to this dataset ID from the log output.
The Socrata Writer may fail when creating datasets if you are loading a relatively large amount of data (60+ MB). If you get this error when creating a new dataset you need to first "seed" the dataset with a smaller number of records:
The JSON data is incomplete: Unexpectedly encountered the end of JSON data Socrata Writer: HTTP 100
To "seed" a dataset with a smaller number of records, in the Reader you are using you should reduce the Max Features to Read by finding the Reader in the Navigator panel (upper left) and going to Parameters > Features to Read > Max Features to Read. Set the value to something relatively small (5000). Run the workflow to create the dataset then get the resulting dataset ID (from the log as described above), input it as the Dataset Name in the Socrata Writer, set Truncate Dataset First to "Yes", set the Max Features to Read back to blank, and run the workflow again to replace the seeded dataset with the complete set of rows you wish to publish.Step 4: Configure the update method
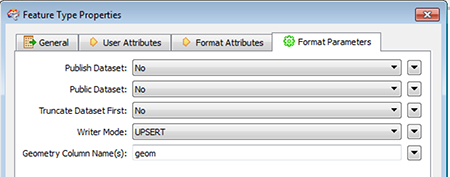
By default the Socrata Writer will perform an UPSERT on the dataset. However, you can also configure it to perform REPLACE or DELETE using the “Format Parameters” tab within the Feature Type Properties of the Socrata Writer Object.
UPSERT: Select “UPSERT” from the “Writer Mode” dropdown and set “Truncate Dataset First” to “No”REPLACE: Select “UPSERT” from the “Writer Mode” dropdown and set “Truncate Dataset First” to “Yes”DELETE: Select “DELETE” from the “Writer Mode” dropdown and set “Truncate Dataset First” to “No”
Step 5: Complete workflow and run translation
After configuring the Writer press OK and you should see the Writer object appear in the workspace area. Now drag the yellow arrowhead on the Reader Object over to the Writer Object. The two Objects should connect and the arrowheads should turn green. Be sure the column names of your .xlsx/.xls file (which are read into FME as Attribute Name) exactly match those of your Socrata dataset. NOTE: the attribute names are case-sensitive. However, you can always use an AttributeRenamer if you need to rename attributes to match the column names of the Socrata dataset.
Click the Run Translation button in the toolbar or go to “File” -> “Run Translation”. The log will display messages on the status of the translation. After the translation completes the last line output in the log should say “Translation was SUCCESSFUL”.
Example FME template workflow to download
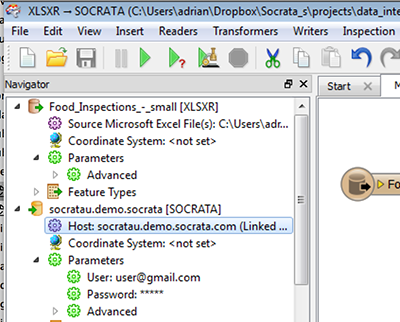
You can download an example template of this workflow here. To get it to work update the “Host”, “User”, and “Password” fields with your credentials under the Socrata Writer feature in the “Navigator” panel to the left of the workspace.
Proxy configuration
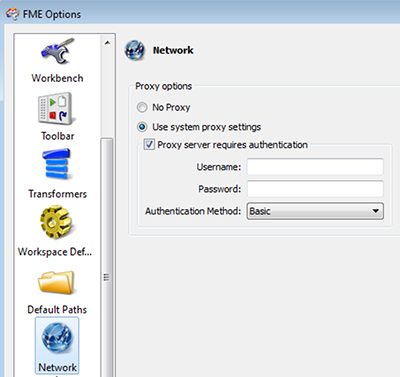
If your organization routes web traffic through a proxy server, you can configure an FME workflow to connect via that proxy. Read how to configure FME to use the proxy server here. The FME Socrata Writer supports the proxy authentication using Basic Authentication.
Scheduling FME transformations
In general there are two approaches you can take to schedule an FME Workflow:
-
If you already have a scheduling tool available to use (e.g. Windows Task Scheduler) you can run an FME Workflow in “batch” or “command-line” mode using the scheduling tool. Information on how to run FME in batch mode is here.
-
If you want an enterprise-level scheduling tool that includes monitoring, logging, auto-emailing, etc. tools you should consider using FME Server or FME Cloud. Documentation on how to schedule using FME Server is here.